Post content has been hidden

To unblock this content, please click here

Jessica
VIP October 2019

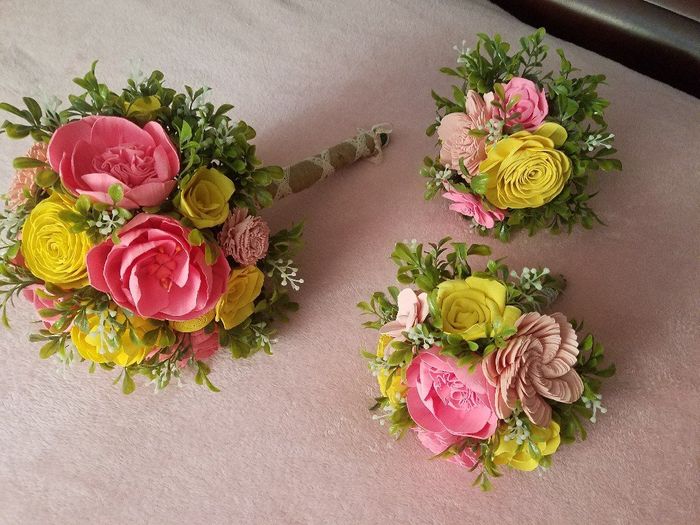
Sola Wood Flower Bouquets! 3 of five done!!!

Jessica, on May 20, 2019 at 5:40 PM

Posted in Do It Yourself 22

Just wanted to share what I completed this weekend. My sola flower bouquets. I actually only finished my bouquet plus the minis for my 2 Jr bridesmaids. Still have to make 2 more for bridesmaids and also the corsage for FMIL.

cfb_1203669.jpg

cfb_1203671.jpg

cfb_1203673.jpg

cfb_1203675.jpg

cfb_1203677.jpg

22 Comments

  • Maria
    Super October 2019
    Maria ·
    • Flag
    • Hide content

    These look awesome! Any method you recommend for making assembly go smoothly? I'm still fiddling and perfecting mine and just can't get to a place I'm satisfied with - perfectionist lol

    • Reply
  • Jessica
    VIP October 2019
    Jessica ·
    • Flag
    • Hide content
    View Quoted Comment
    Oh fun! Are yours sola flowers too?

    Mine turned out much better than I was expecting, this was my first time doing floral arrangements. So, I'm not an expert by any means but Id be happy to share my thoughts.

    -If you haven't already assembled your bouquets, and your going to use greenery, I would suggest trimming off the small leaves at bottom of greenery before you start. Sorry for the poor artwork, but I attached a pic as best I could. So basically, if it's a leaf or Berry, etc that WON'T be visible once the bouquet is completed, then cut it off. I found it difficult to get the flowers and greenery to align the way I wanted with the extra leaves hitting the stems I was trying to add.

    -So this was the biggest help for me: I personally think I "cheated". All the videos I watched online about assembling bouquets said to only wrap with floral tape when you were completely done with your bouquet. But no matter how I tried, I just couldn't get the flowers to line up correctly. So after each flower I added, i would wrap the whole 'handle' with floral tape. This kept the flowers i had already arranged from shifting positions when i added my next flower, as they were firmly held together with floral tape. Also, the stems on these flowers are just thin pieces of metal, like firm wire that can be bent. So when all the flowers were together in place, the handle was WAY too small. Adding the tape after each flower made the handle thicker and be more of an appropriate size. If there were any gaps or uneven spots in the handle, I would fill them in with hot glue and allow to cool and harden. Then I was ready to add my twine and lace.


    -I think it was easier to add the greenery as I made the boquet. Several videos I watched added it later, but that didnt allow me to see if I really liked what I had arranged so far.

    -This shouldn't be necessary for live or silk flowers, but highly recommend it for sola: Use tape and a small spot of hot glue to keep the flowers on their stem. Note: this needs to be done after placing them on the stem and after dyeing them but before you start arranging.

    To do this you turn the flower head upside down (so the part that will attach to the stem is facing up), add a small spot of on the flower but near the stem, then, immediately place one end of floral tape on glue to adhere to the flower. Give it a second to cool and harden. Once its firm, tightly wrap the floral tape down the wire stem. I also added a small spot of glue here and there going down the wire to help it from coming unraveled. Doing this step keeps the heads from coming off while your arranging them.

    I found it hardest to start the bouquet. Once I got it going I was fine, but I would just be like "What do I start with?". So, when starting each bouquet I would pick my two favorite flowers and arrange them until I found a look I liked, then wrap with floral tape. I'd pick another flower, arrange to my liking, then again wrap with floral tape, and so on and so forth until my bouquet was the size I wanted. Also, I did not have any 2 flowers I started with and kept their stems straight. For example, I'd put them beside each other and slightly angle each flower head to the sides of the bouquet so that I was already starting the rounded look I was going for.

    I also tried to start with the larger flowers. I saved smaller buds for filling in gaps or to help even out the bottom of bouquet. I figured it was easier to add a small flower than a big flower when you already had created a portion of the bouquet you were happy with.

    I would wait until I had about 4 flowers before I started adding greenery. This allowed me to see where the holes would be that needed to be filled and how much filling needed to be done.


    I also tried not to place more than 2 flowers of the same color together. This helped keep the colors evenly spread out. I did have no choice but to have the same color because each other a few times, but it wasnt enough to make them look off balance.

    Hope something here helps you get your flowers the way you want
    • Reply

You voted for . Add a comment 👇

×
WeddingWire celebrates love ...and so does everyone on our site! Learn more

Groups

WeddingWire article topics